How to Move Layers in Alight Motion? Step-by-Step Guide 2026
Eventually, the smooth and energetic motion of layers makes a project look more real and exciting. So, how can you move the layer precisely in Alight Motion? Why are your layers in the project not moving smoothly?
If you are worried about the unnatural movement of layers or want to create professional-looking animation and transition using this app. It is the correct place for you. Here we will give you information about the importance of layer movement, an essential method to transform layers.
The layering feature of Alight Motion Pro APK offers different creative options. In case you have various canvases, where you can add different elements like shape, text, image effects, and visual effects in a single frame. So, each of these elements has its layer and gives complete control and flexibility for their movement.
This article also helps you to understand the basic concept of how these different layers interact. Here, you will also learn about pro tips and methods to animate the items by scaling, positioning, or some others. Let’s read to know the full potential of Alight Motions APK!
Benefit to Move Layers in Alight Motion
The movement of layers in Alight Motion MOD APK helps you to keep organized and control each element in your project. Utilizing this feature, you can animate layers in Alight Motion by changing the layer order. You can create more detailed and attractive visual designs easily. Here is why Alight Motion layer management is crucial:
What is Layer Mean in Alight Motion?
The core strength of this application lies in its layering feature, which enables you to combine various elements in one project exactly. This option is significant for adding aesthetic and detailed information in depth to the project. This feature allows you to stack different components, arrange them separately, and cluster them for combined control and creating high-quality content.
The two basic layer types are the video layer and the audio layer present in AM MOD. Video Layers sport all visual elements like image video clips, text effects, transition, and animation; each of these components is placed on an individual layer before combining them.
However, Audio Layer houses allow sound components like voice-over and background music, empowering you for exact synchronization with your visual in the project.
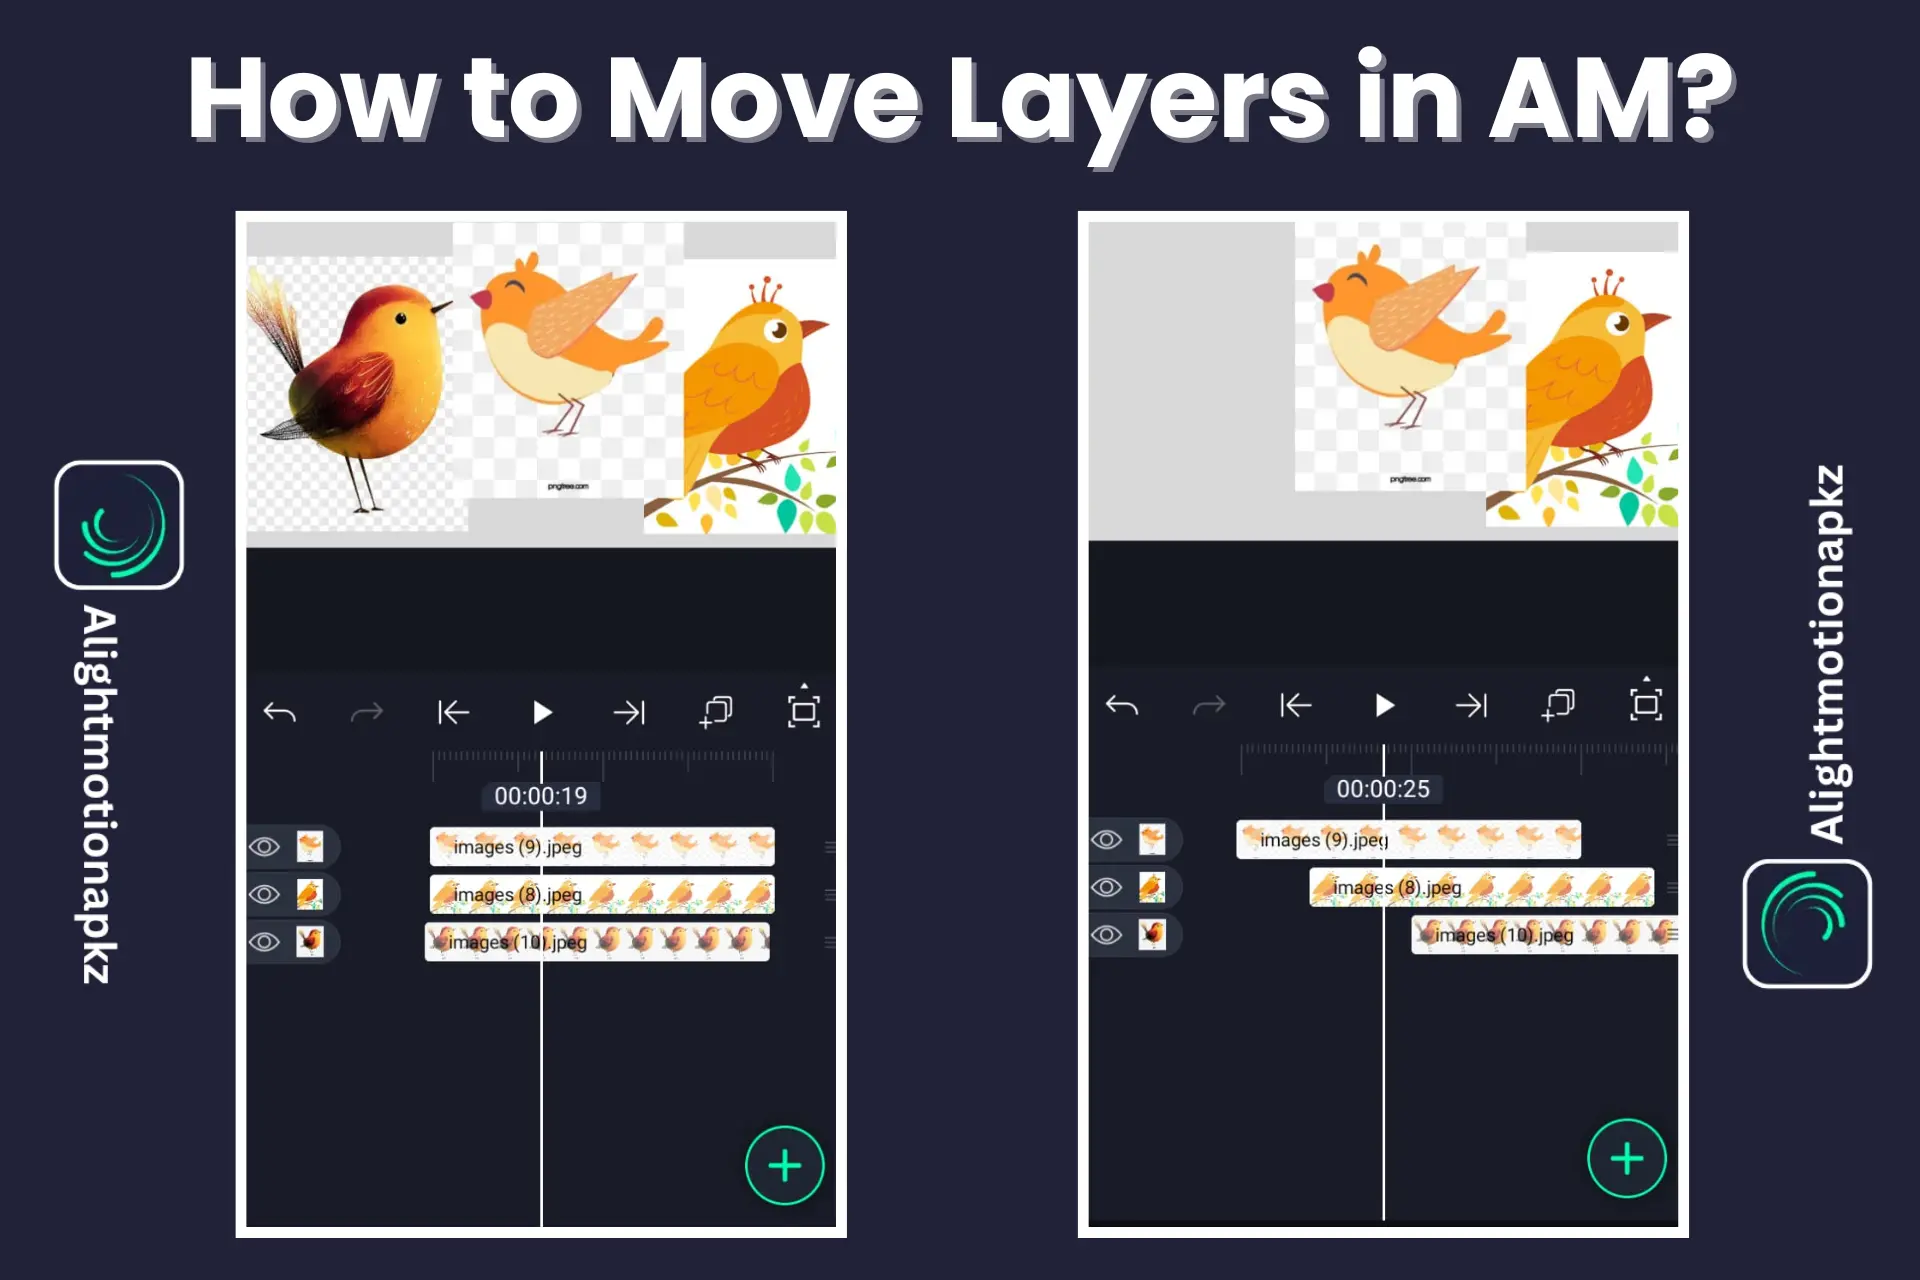
How to Move Layers in Alight Motion?
This application is a reliable tool for creating animation and eye-catching video content. A versatile feature is the editing layer in Alight Motion, which helps you to create professional results. Obey these simple procedures you can learn how to move layers and express your idea in visuals:
Step 1: First, you add text, image, audio, video, or other elements to add as a layer to the project.
Step 2: List of added layers shown in the layer panel.
Step 3: On the right side of each layer in the layer panel, 3-line icons appear. Tap and wait for one or two seconds until it becomes dark.
Step 4: Then, you can drag the layer left/right or up/down easily.
Step 5: Finally, you will see a change in the position of layers in the preview panel.
How to Group Layers in Alight Motion?
To implement similar visual effects to multiple layers with only one click, group them. It improves your editing experience and supports consistency, furnishing a proficient look to your project. By following these basic steps, you can combine layers in your project:
Step 1: Press and hold the “EYE” icon for a few seconds (“EYE” icon present at left of layer panel).
Step 2: A checkmark will be seen after selecting the layer.
Step 3: Click on other layers which event to look in combined form.
Step 4: At the top, a menu bar will appear, which has three different grouping icons.
Step 5: Select your desired icon to group layers into a single layer.
How do You Ungroup Layers in Alight Motion?
If you want to edit each layer individually after grouping them, you will be required to ungroup them. It offers you complete control over editing each layer. By following these simple steps, you can ungroup layer in Alight Motion APK easily:
Step 1: The editing panel will open after clicking on grouped layers.
Step 2: Three dots appear at the top right corner. Select them, and tap the ungroup option.
Step 3: Now, you can edit each layer separately in the timeline.
How can You Hide and Unhide Layers in Alight Motion?
Hide and unhide layer options in this app help you to edit accurately, maintain focus, and view lower layers clearly.
Hide a Layer
Click and hold the “EYE” icon on the right side in the layer panel and you can access the bottom layer for precise editing.
Unhide a Layer
Press the “EYE” icon again to view all layers and resume editing.
To Summarize
This Alight Motion tutorial will be helpful for you in case you learn how to move group and group hide and unhide the layer in it. You have some more options like stretch, extend, merge, rename, and delete layers in this app.
So, improving the concept of layers is necessary to create an impressive animation. After following the above-given methods, you can improve your layer coordination skill and craft visually engaging and polished content. That performs well and grabs attention on digital platforms.